Contrary to the common belief that advanced skiing requires more strength, true carving is about physics, not force. The key is to stop pushing your skis and instead learn to manipulate your center of mass to let the ski’s design do the work. This guide deconstructs how to transition from inefficient, muscle-heavy skidding to the effortless, clean glide of a carved turn by mastering precise energy transfer.
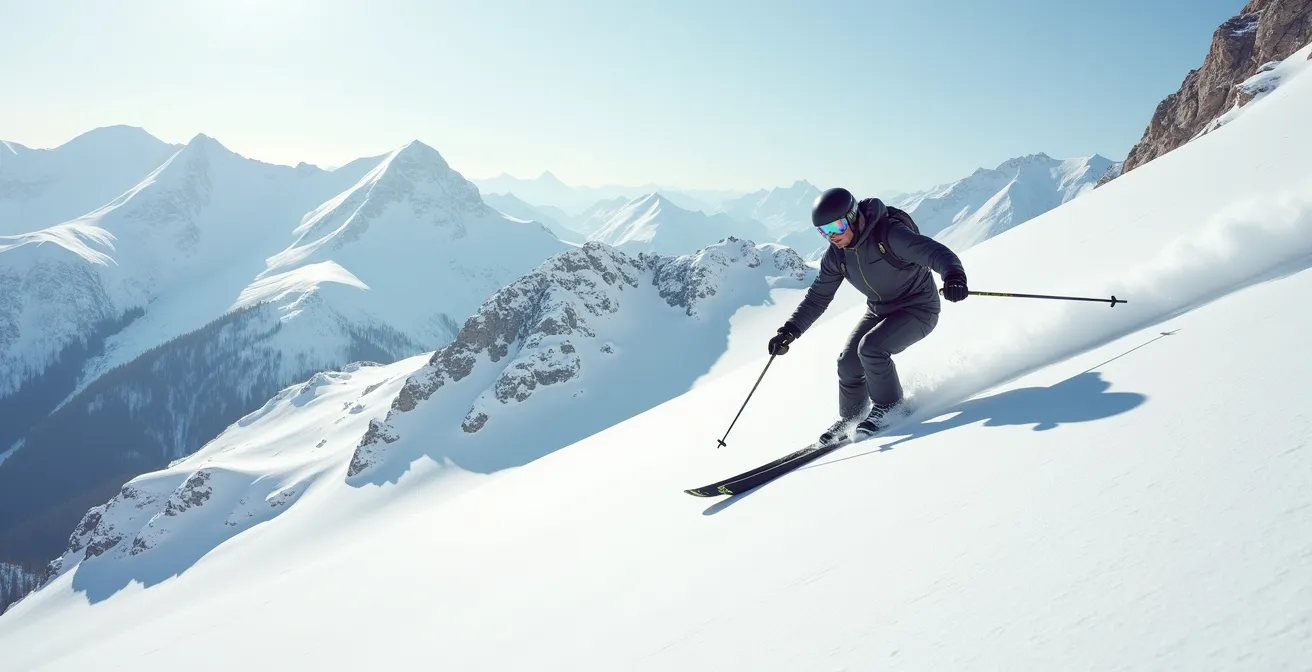
For many intermediate skiers, progress hits a wall. You’ve moved past the beginner’s wedge, but your turns feel more like a controlled skid than a graceful arc. Every turn involves scrubbing speed, pushing snow, and a significant amount of muscular effort. You see experts laying down pencil-thin tracks with what looks like zero effort and wonder, “What’s the secret?” You’ve probably heard the usual advice: “bend your knees,” “pressure the downhill ski,” or “get on your edges.” While not incorrect, these are symptoms, not the cause.
The fundamental misunderstanding lies in the very goal of a turn. Skidding is a braking action; you are forcing the ski sideways against its direction of travel. Carving, on the other hand, is a gliding action. You are engaging the ski’s built-in geometry—its sidecut—to create a clean, efficient arc. It’s a shift from fighting the mountain to collaborating with it.
The breakthrough comes from understanding the underlying physics. A carved turn is essentially a controlled fall into the turn, managed by precise weight distribution and body angulation. It’s about directing your mass and letting the ski’s design and gravity do the heavy lifting. Forget pushing; it’s time to think about tipping, pressuring, and projecting your body to harness the forces already at play.
This guide will deconstruct the mechanics of an efficient turn. We will analyze the forces at work, the role of your equipment, the critical body positions that enable control, and how to finally link these perfect arcs together. Prepare to transform your skiing from a battle of attrition into an exercise in efficiency.
This article breaks down the essential mechanics and concepts to transform your skidding into carving. Explore the key principles that will unlock a new level of control and efficiency on the slopes.
Summary: From Skidding to Gliding: A Mechanical Breakdown
- Why Tipping the Ski on Edge Creates a Turn Without Muscular Effort?
- How to Commit Weight to the Outside Ski to Initiate Turns?
- Flex 80 vs. Flex 120: Does Stiffer Boots Improve Your Carve?
- The Backseat Driver: Why Leaning Back Makes You Lose Control?
- Initiation to Exit: How to Link Turns Smoothly for Speed Control?
- Why Being Flexible Doesn’t Mean You Have Usable Mobility?
- Skiing vs. Snowboarding: Which Is Harder to Learn but Easier to Master?
- Deep Powder Technique: Why Your Groomed Run Habits Cause You to Sink?
Why Tipping the Ski on Edge Creates a Turn Without Muscular Effort?
The most profound shift in understanding carving comes from realizing the ski is a tool engineered to turn. A modern ski has a parabolic shape, or sidecut, meaning it’s wider at the tip and tail than it is underfoot. When you tip the ski onto its edge and apply pressure, the ski bends into a reverse arc against the snow. This arc is the path the ski *wants* to follow. Your job isn’t to force the ski to turn; it’s simply to engage this built-in geometry and allow it to guide you.
Skidding, in contrast, ignores this design. It involves pushing the tails of the skis out, using friction to scrub speed and change direction. This is a brute-force maneuver that is both inefficient and tiring. Biomechanical analysis confirms this difference in energy expenditure. In fact, according to research, carving requires 40-60% less muscular effort than skidding for the same turn. The sensation is one of gliding on a rail, with the turn generated by the ski’s path, not your leg muscles pushing against the snow.
The initiation of this process is subtle. It begins with rolling your ankles and knees into the slope. This action, known as edging, tips the skis. As your center of mass moves across the skis, pressure builds on the new edge, causing the ski to decamber (bend) and engage its sidecut. At this point, the ski takes over, pulling you through a clean, arcing turn. The goal is to move from a rotational input (twisting your feet or hips) to an angulation input (tipping your lower body).
This is why skidded turns leave a wide, brushed track in the snow, while a pure carve leaves only a thin pencil line. One is a controlled slide; the other is a precise incision. Mastering the latter is the key to unlocking effortless, efficient skiing.
How to Commit Weight to the Outside Ski to Initiate Turns?
Once you understand that the ski’s sidecut does the turning, the next question is: how do you apply the pressure needed to bend it? The answer lies in committing your weight fully to the outside ski of the turn. An unweighted ski cannot bend, and an unbent ski cannot carve. Many intermediate skiers make the mistake of keeping their weight evenly distributed or, even worse, leaning on their inside ski, which prevents the outside ski from engaging properly.
The turn initiation should be a deliberate transfer of your Center of Mass (CoM). As you finish one turn, you should be actively moving your CoM across your skis to the new outside ski. This isn’t a passive lean but a dynamic projection of your body towards the inside of the new turn. This commitment creates the pressure that engages the edge and decambers the ski, locking it into its arc. The earlier you can establish this pressure on the outside ski, the cleaner the top of your turn will be.
This pressure must be directed toward the front half of the ski during initiation. By driving your shin into the tongue of your boot on the new outside ski, you ensure the tip of the ski engages the snow immediately, pulling you into the turn rather than skidding into it. A common fault is to pressure the ski from a centered or backward stance, which causes the tail to wash out.
Case Study: The ‘Phantom Lift’ Drill for Weight Commitment
A highly effective method to train this skill is the “lifting the inside ski” drill. As you initiate a turn, consciously lift your new inside ski a few inches off the snow. This action forces 100% of your weight onto the outside ski. By practicing this, you train your body to stand on the outside ski as early as possible in the turn. This creates maximum forward pressure at the turn’s apex, distributing weight over the front of the new outside ski and resulting in a strong, clean carved initiation.
Flex 80 vs. Flex 120: Does Stiffer Boots Improve Your Carve?
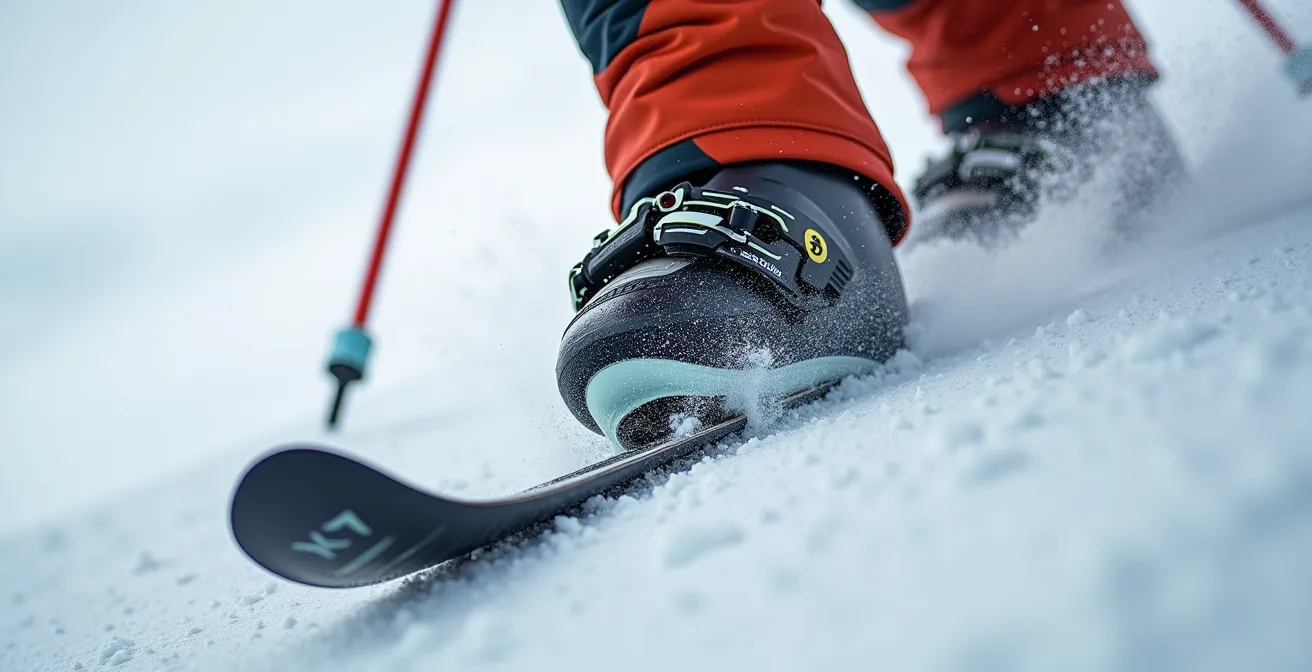
A skier’s primary interface for controlling their skis is their boots. They are the transmission of the kinetic chain, translating the subtle movements of your ankles, knees, and hips into precise commands for the ski. The stiffness of a boot, indicated by its “flex” rating, plays a critical role in the efficiency of this energy transfer. A boot with a lower flex (e.g., 80) is more forgiving and comfortable, but it can absorb and dampen the energy you’re trying to send to the ski’s edge. A stiffer boot (e.g., 120+) offers a much more direct and immediate connection.
For carving, this responsiveness is paramount. When you apply pressure to the tongue of a stiff boot, that energy is transferred almost instantly to the ski’s edge, helping it to engage and hold its line. In a softer boot, some of that forward pressure is lost as the boot’s cuff flexes, leading to a delayed or less powerful edge engagement. This can be the difference between a ski that locks into a carve and one that chatters or slips out.
However, a stiffer boot is not always better. The ideal flex depends on the skier’s weight, strength, and technical ability. A lighter skier or someone without the strength to flex a very stiff boot will be forced into a permanently backward stance, completely negating any benefits. The boot must be stiff enough to provide support and transfer energy, but supple enough that the skier can maintain a dynamic, forward position and actively flex their ankle. As the REI Expert Advice team notes, this responsiveness is a key component of advanced technique.
Stiffer boots are more responsive, which is key to advanced carving techniques.
– REI Expert Advice Team, REI Carving Guide
Choosing the correct boot is a balance. As you progress from skidding to carving, you will likely find that your softer, more comfortable intermediate boots are holding you back. Upgrading to a boot with a higher flex rating provides the necessary platform for the precise energy transfer that carving demands. It enables you to control the edge angle with greater sensitivity and power.
The Backseat Driver: Why Leaning Back Makes You Lose Control?
The single most common and destructive habit preventing skiers from carving is being in the “backseat.” This means your center of mass is behind your feet, forcing your weight onto the tails of your skis. When this happens, a carved turn becomes a physical impossibility. The front of the ski, where the sidecut is designed to initiate the turn, becomes unweighted and lifts slightly off the snow. You lose your steering.
With no pressure on the shovel of the ski, it cannot engage the snow and pull you into an arc. Instead, the only control you have is to push the over-pressured tails sideways, resulting in an inevitable skid. Biomechanical data highlights the severity of this issue; research shows that leaning back can shift over 70% of your pressure to the ski tail. A ski will not bend into its carving arc unless the weight is centered over its middle, allowing both the tip and tail to do their jobs.
Maintaining a forward, athletic stance is non-negotiable. This means your shins should be in constant contact with the tongue of your boots, your hands should be forward where you can see them, and your shoulders should be over your toes. This posture ensures your center of mass is projected forward, allowing you to pressure the front of the ski to initiate the turn and then balance on the sweet spot of the ski throughout the arc. Being in the backseat is a defensive, reactive position; a forward stance is an offensive, proactive one.
Correcting this fault requires conscious effort and often specific drills. The goal is to build the muscle memory of keeping your weight forward, even and especially when the terrain gets steep or your speed increases, which is when the instinct to lean back is strongest.
The Shin-to-Tongue Correction Protocol: Your Action Plan
- Constant Pressure Check: Actively think about maintaining constant shin pressure against your boot tongues throughout every phase of the turn. If you feel a gap, you’re in the backseat.
- Hands Forward Cue: Keep your hands and arms approximately 10cm forward of your upper body. This serves as a powerful visual and physical cue to keep your upper body from falling back.
- Combined Movement: As you roll your knees into the slope to initiate a turn, simultaneously press your shins forward into the boots. This links the edging motion with the forward weight shift.
- ‘Hands on Knees’ Drill: On a gentle slope, practice making turns while physically placing your hands on your knees. This forces you into an aggressive forward stance and helps you feel the correct body position.
Initiation to Exit: How to Link Turns Smoothly for Speed Control?
A single carved turn is a great achievement, but the art of skiing lies in linking them together in a seamless, rhythmic flow. Smooth transitions are the key to managing speed and maintaining momentum. Unlike skidding, where speed is scrubbed with each turn, carving generates energy. The exit of one turn becomes the initiation of the next, creating a continuous cycle of pressure and release that allows you to control your speed by adjusting your turn shape, not by braking.
The transition phase is the most critical part. As you come to the end of a carved turn (the exit), your skis are under maximum pressure and pointed across the fall line. To initiate the next turn, you must smoothly release the pressure from these edges and transfer your center of mass over to the new outside ski. This is achieved through a fluid flexion and extension of the legs. As you exit the turn, you flex (bend) your legs to absorb the pressure, and then you extend into the new turn, projecting your body across the skis.
A common mistake is to “stand up” between turns, which breaks the flow and momentarily unweights both skis, leading to instability. The movement should be a low, powerful cross-over, not an up-and-down motion. The goal is to spend the minimum possible time with your skis flat on the snow. A smooth transition means you are almost always on one set of edges or the other. This constant edge engagement is what provides continuous control.
This rhythm is what gives expert skiing its graceful appearance. It’s a dance with gravity, where speed is managed not by hitting the brakes, but by lengthening or shortening the radius of the turn. A longer, more drawn-out “S” shape across the slope will maintain speed, while quicker, more C-shaped turns that cross the fall line more aggressively will naturally control it. This is the ultimate expression of efficient skiing: controlling your descent by manipulating the path of your glide.
Why Being Flexible Doesn’t Mean You Have Usable Mobility?
In the quest for better carving, many skiers focus on strength and endurance, but overlook a critical physical attribute: mobility. There’s a crucial distinction between flexibility and mobility. Flexibility is the passive range of motion of a joint—how far someone can push or pull you into a stretch. Mobility, on the other hand, is your usable range of motion—how far you can move a joint using your own muscular control. For a dynamic sport like skiing, mobility is what matters.
Carving requires significant active control through a wide range of motion, particularly in the hips and ankles. You can be passively flexible enough to touch your toes, but if you lack the active mobility to flex your ankle deeply under load (dorsiflexion) or rotate your hips internally while keeping your upper body stable, your carving will suffer. For instance, poor ankle dorsiflexion will prevent you from driving your shins into your boots, forcing you into the backseat. Limited hip internal rotation will restrict your ability to angulate and maintain edge pressure through the turn.
This is where the concept of the kinetic chain becomes vital. A restriction in one joint will force compensation elsewhere. Stiff ankles lead to excessive knee or hip movement, breaking your alignment and causing a loss of edge grip. Building usable mobility ensures that your body can achieve the necessary positions for carving—like deep angulation and a forward stance—with stability and control. As studies on the biomechanics of skiing show, carving requires significant body tension and control, which is a direct product of active mobility, not just passive flexibility.
Off-piste training should therefore focus on dynamic movements that build this controlled range of motion. Performing targeted exercises can directly translate to better performance and a reduced risk of injury on the snow.
- Seated Hip Internal Rotation Test: While seated with knees bent at 90 degrees, try to rotate your thigh inward without moving your pelvis. A range of 35-40 degrees is ideal for achieving proper hip angulation in a turn.
- Ankle Rocker Test: Standing facing a wall with your foot flat on the floor, see how far you can move your knee forward past your toes without your heel lifting. A minimum of 38-42 degrees of dorsiflexion is needed for a deep, forward stance.
- Banded Hip Rotations: Using a resistance band around your knees while in a squat position can help build active control of your hip rotators.
- Dynamic Ankle Circles: Performing controlled circles with your ankle before skiing is a great way to activate the joint’s full range of motion.
Skiing vs. Snowboarding: Which Is Harder to Learn but Easier to Master?
The debate between skiing and snowboarding often includes a discussion of the learning curve. The general consensus is that skiing is easier to learn initially but harder to master, while snowboarding is harder for the first few days but has a quicker path to proficiency. This holds true when specifically analyzing the journey to carving. A first-time skier can be taught the “pizza” or wedge, a stable and intuitive way to control speed, within the first hour. A first-time snowboarder, however, will spend most of their first day falling while trying to find balance on their heel and toe edges.
This initial difficulty in snowboarding gives way to a more straightforward progression. Once a snowboarder learns to link turns, the path to carving is relatively direct. It’s a whole-body movement on a single edge. Mastering a carved ski turn is a more complex motor challenge. You have four edges to manage, and your legs must work both independently and in concert. The transition from the intermediate plateau of skidded parallel turns to true carving is a significant technical leap that many recreational skiers never make.
As ski coach Fede Wenzel points out, the skill is rarer than many believe: “Only 10% of recreational skiers can carve. The best recreational skiers were racers.” This highlights the nuance required. Carving on skis demands a fine-tuned separation of the upper and lower body, precise weight management on one outside ski, and the coordination to do it all while switching seamlessly from one side to the other.
The following table breaks down the comparative complexity in the journey towards carving:
| Aspect | Skiing | Snowboarding |
|---|---|---|
| Initial Learning | Easier start with pizza wedge | Harder first days, more falls |
| Intermediate Plateau | Long plateau at parallel turns | Faster progression after basics |
| Carving Complexity | Two independent edges to manage | Single edge, full body movement |
| Master Level | More nuanced techniques possible | Simpler but effective carving |
Key Takeaways
- Carving is an act of physics that uses the ski’s sidecut, not muscular force, to turn.
- Committing your weight to the outside ski is essential for bending the ski into its turning arc.
- A forward stance with shin-to-boot contact is non-negotiable; leaning back makes carving impossible.
Deep Powder Technique: Why Your Groomed Run Habits Cause You to Sink?
Mastering the carve on groomed runs is a pinnacle of ski technique, but taking those same habits into deep powder is a recipe for disaster. The very principles that create an efficient carve on hardpack—aggressive edging, heavy pressure on the outside ski, and a forward stance—will cause you to sink and lose control in soft snow. Understanding why these habits fail is key to adapting your technique and learning to float.
On a groomer, you want the ski to cut *into* the snow. In powder, you want it to plane *on top* of the snow. A deeply engaged edge that works so well on ice will simply dive and anchor you in powder. The focus must shift from edge-centric control to using the entire base of the ski as a planing surface. Turns in powder are more about steering and “smearing” than incisive carving. While modern freeride technique does incorporate carving principles, especially on wider skis, it’s a much gentler, more nuanced application.
The weight distribution also changes completely. The carving mantra of “100% weight on the outside ski” will cause that ski to dive while the unweighted inside ski flaps uselessly. In powder, you need a more equal weight distribution on both skis. This creates a wider, more stable platform that promotes flotation. Likewise, the aggressive forward stance of a racer will drive your tips under the snow. You must adopt a more centered or even slightly rearward stance to keep your ski tips up and planing.
The rhythm changes from a powerful, locked-in arc to a fluid, bouncing motion. Good powder skiing involves a rhythmic up-and-down movement, unweighting the skis at the transition to help them rise to the surface before gently guiding them into the next turn. It’s a lighter, more patient approach that works with the snow, not against it. This contrast reinforces the core idea that great skiing is about applying the right physical principles to the conditions at hand.
The journey from a skidding intermediate to a confident carver is a process of un-learning bad habits and embracing the physics of your equipment. It is a transition from force to finesse. By focusing on these mechanical principles—engaging the sidecut, managing your center of mass, and using the right body position—you unlock a more efficient, powerful, and ultimately more enjoyable way to descend the mountain. The next logical step is to apply these concepts on your next run. Focus on one element at a time and begin to feel the difference between fighting your skis and gliding with them.