Contrary to popular belief, being constantly clipped to a via ferrata cable does not make it inherently safer than rock climbing; in fact, it introduces unique and violent fall physics that can be more dangerous if misunderstood.
- A short fall on a via ferrata’s static cable generates significantly higher impact forces than a longer fall on a dynamic climbing rope.
- Your survival depends entirely on a single-use shock absorber in your lanyard, which has strict weight limitations.
- The integrity of the entire system—from the cable to the anchors in the rock—is an “objective hazard” you cannot control but must learn to inspect.
Recommendation: Shift your mindset from ‘I’m safe because I’m clipped in’ to ‘I am responsible for understanding and managing the specific risks of this system.’
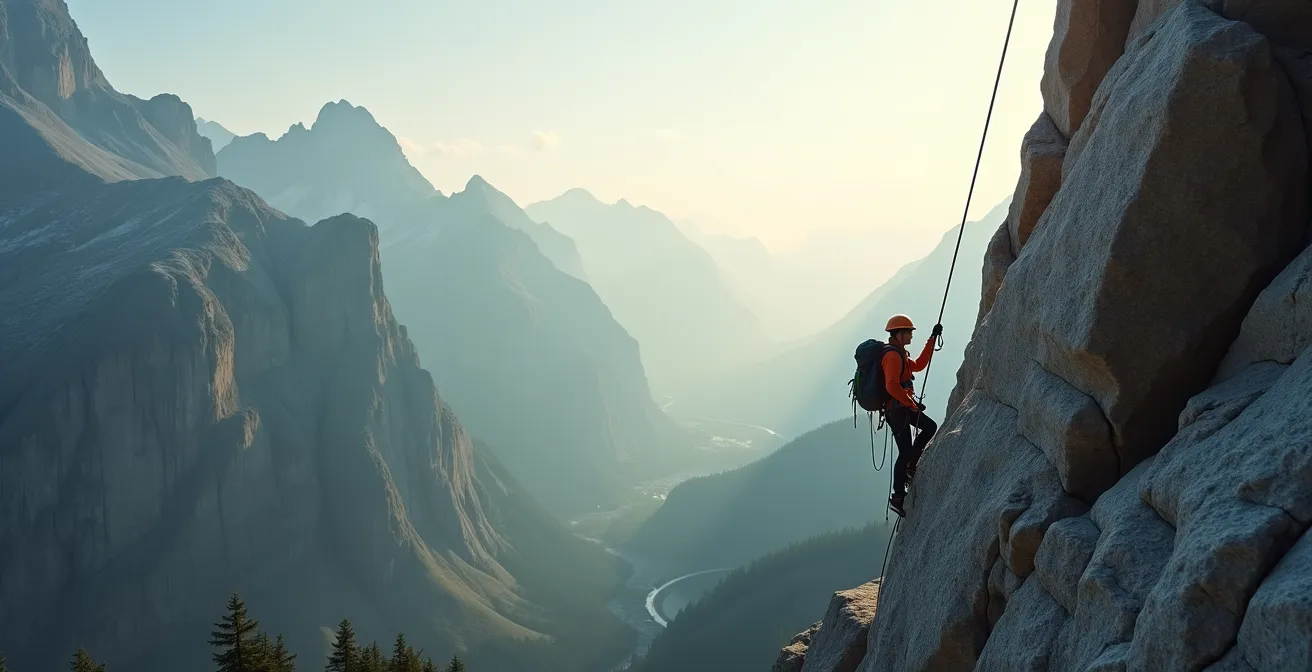
There’s a common and dangerous assumption among hikers and novice climbers when they first see a via ferrata. The continuous steel cable, the sturdy iron rungs, and the satisfying click of two carabiners create a powerful illusion of absolute security. The thinking goes, “I’m always attached, so I can’t fall. This is just climbing, but with a safety net.” As a mountain guide, I can tell you this mindset is not only wrong, it’s a direct path to a serious incident. The belief that ‘clipping in’ is a substitute for knowledge is the single greatest subjective hazard you bring to the mountain.
The safety protocols for via ferrata are not a simplified version of climbing; they are a different discipline entirely, governed by brutal and unforgiving physics. While traditional climbing uses a dynamic rope designed to stretch and cushion a fall like a bungee cord, a via ferrata system is fundamentally static. Falling onto that steel cable is like falling onto a concrete floor. Without the correct, specialized equipment functioning exactly as designed, the forces generated can be catastrophic, even from a fall of just a few feet.
This is not a matter of it being physically harder than climbing—often, it’s not. It’s a matter of a different, and in some ways more rigid, set of risks. Understanding this difference is the first, and most critical, step in your safety plan. This article will not teach you how to climb. It will explain the forces at play, the critical role of your equipment, and the risk management mindset required to treat these “iron ways” with the respect they command. We will deconstruct the illusion of the safety cable and replace it with genuine, life-saving knowledge.
This guide will walk you through the critical safety distinctions you must understand before you ever clip into a cable. We will cover the hidden physics of via ferrata falls, the life-saving technology in your lanyard, and the environmental and human factors that turn a thrilling day out into a potential tragedy.
Summary: A Guide to the Real Risks of Via Ferrata
- Why a Short Fall on Via Ferrata Can Generate Higher Forces Than Climbing?
- How Shock Absorbing Lanyards Save Your Spine?
- Inspect Before You Clip: How to Spot Loose Cable Anchors?
- The Lightning Conductor: Why Being on a Cable in a Storm Is Deadly?
- The Buddy System: What to Check on Your Partner’s Harness Before Starting?
- MIPS vs. Standard Helmets: Is the Extra Cost Worth the Brain Protection?
- Objective Hazards: How to Read Weather Signs Before the Storm Hits?
- Wilderness Risk Management: How to Plan Adventures in Uncontrolled Environments?
Why a Short Fall on Via Ferrata Can Generate Higher Forces Than Climbing?
The most dangerous misunderstanding in via ferrata is the concept of the “fall factor.” In traditional climbing, the fall factor is calculated by dividing the length of the fall by the length of dynamic rope available to absorb the impact. A long fall on a lot of rope can be surprisingly soft. On a via ferrata, you fall until your lanyard catches the last anchor point. The length of “rope”—your static lanyard—is always very short. Even a small drop of a few feet between anchors creates a high fall factor, generating immense, instantaneous forces.
This isn’t theoretical. The physics are unforgiving. While a typical dynamic climbing rope is designed to keep fall forces on the climber below 4 kilonewtons (kN), the static nature of a via ferrata system means even short falls can be far more violent. In fact, research demonstrates that via ferrata falls can exceed 6 kN, a force sufficient to cause serious injury or equipment failure if not properly mitigated. Your body and standard climbing gear are not designed to withstand such impacts.

As the diagram above illustrates, the energy has nowhere to go. On a dynamic rope, the energy is dissipated through stretch. On a steel cable, that entire shock load is transferred directly to your body and your equipment. The crucial takeaway is this: a fall on a via ferrata is not a “fall” in the climbing sense; it is a high-impact collision. This distinction is the foundation of all via ferrata safety.
Case Study: Slovenian Via Ferrata Fall Tests
To demonstrate this principle, tests on the Mojstrana Via Ferrata in Slovenia used 80kg weights to simulate a falling climber. When the weight was attached with simple static slings (equipment without a shock absorber), the impact forces measured a catastrophic 22 kN. This is a non-survivable force. However, when a modern, certified via ferrata energy-absorbing lanyard was used, the forces were successfully reduced to well under the 6 kN safety threshold. This proves that the specific via ferrata set is not just a recommendation; it is the only thing making a fall survivable.
How Shock Absorbing Lanyards Save Your Spine?
Given the violent forces described above, how is it possible to survive a via ferrata fall at all? The answer lies in one critical, and single-use, piece of technology: the energy absorber. This component, often called a shock absorber, is a tightly packed bundle of specially stitched webbing concealed within a zippered pouch on your via ferrata lanyard. It is not just a feature; it is the core function of the entire device. It is the system’s “crumple zone,” designed to tear apart in a controlled manner to dissipate the massive energy of a fall.
When you fall, the force of the impact causes the specialized stitching inside the pouch to rip. This progressive tearing action absorbs the energy that would otherwise be transferred to your spine and internal organs, extending the deceleration time and dramatically reducing the peak impact force to survivable levels. Without this deployment, your body becomes the shock absorber, and the outcome is severe injury. This is why you must never use standard climbing slings or daisy chains as a substitute for a via ferrata lanyard.
Crucially, these devices are engineered to work within a specific weight range. According to Edelrid’s technical specifications, modern sets are typically rated for users between 40 kg and 120 kg (approximately 88 to 265 lbs). For a person who is too light, the force of the fall may not be sufficient to initiate the tearing of the shock absorber, leading to a hard impact. For a person who is too heavy, the absorber may tear completely through without sufficiently slowing the fall. Always verify your total weight (including gear) falls within the rated range of your specific lanyard.
Inspect Before You Clip: How to Spot Loose Cable Anchors?
Your personal equipment is only one half of the safety equation. The other half is the via ferrata itself—a fixed system of anchors and cables that you must trust with your life. This system is an objective hazard; it is part of the environment, and its condition is outside your direct control. However, you are in complete control of your decision to use it. A responsible mountaineer never assumes the route is safe. You must become a proficient inspector of the system’s integrity.
Professionally managed routes are inspected periodically. As Tahoe Via Ferrata Guide Will Sperry notes, “Twice a year, the route is inspected by the team who built it. These pros complete visual inspections and pull-tests to determine how strong the rock/hardware interface is.” But what about the days and months between those checks? Rockfall, water, ice, and simple wear and tear can compromise an anchor. Your personal inspection before and during your climb is a critical layer of risk management.
Twice a year, the route is inspected by the team who built it. These pros complete visual inspections and pull-tests to determine how strong the rock/hardware interface is.
– Will Sperry, Tahoe Via Ferrata Safety Management Interview
Look for tell-tale signs of weakness. Is the cable sagging excessively? Are there frayed strands, especially near the anchors? Do the anchors themselves look secure? Look for rust stains seeping from the borehole in the rock, which can indicate internal corrosion. Check for loose nuts and examine the surrounding rock for new cracks or fractures. If something feels or looks wrong, do not commit to it. Trust your gut and find an alternative route or turn back. Reporting your findings to the local alpine club or route maintainer is also a vital part of being a responsible member of the mountain community.
Action Plan for Anchor Integrity Checks
- Visual Scan: Look for rust stains seeping from the borehole, indicating potential internal corrosion.
- Hardware Check: Check for any loose or spinning nuts on the anchor plates and inspect cable strands for any signs of fraying, particularly near termination points.
- Auditory Test: If it is safe to do so, tap the anchor gently. Listen for a solid ‘thud’ which indicates a secure placement, as opposed to a hollow or vibrating sound which suggests a problem.
- Rock Examination: Carefully examine the surrounding rock for any fractures, spalling, or signs of stress around the anchor points.
- Reporting Protocol: If you find any suspect anchors, do not use them. Make a note of the location and report it to the local alpine club or the route maintainers listed at the trailhead.
The Lightning Conductor: Why Being on a Cable in a Storm Is Deadly?
The steel cable that offers you security can become your greatest enemy in a thunderstorm. Metal is an excellent conductor of electricity, and a via ferrata that traverses an exposed ridgeline or summit becomes, in effect, a giant lightning rod. Being clipped into this system during an electrical storm is one ofthe most dangerous situations a mountaineer can face. The risk is not just a direct strike, but also ground current, where electricity from a nearby strike travels through the cable system and to you.
The danger cannot be overstated. As one mountain guide service puts it in their technical manual, “The via ferratas are a perfect ‘high voltage line’ in case of storm!” This is not hyperbole. Your connection to the cable provides a direct path for thousands of volts of electricity to pass through your body. The only way to manage this risk is to avoid it entirely. Meticulous weather planning is paramount. Check the forecast before you leave, paying close attention to the risk of afternoon thunderstorms, which are common in the mountains.
The via ferratas are a perfect ‘high voltage line’ in case of storm!
– Via Ferrata Dolomites Mountain Guide, Via Ferrata Handbook – Technical Manual
If you see storm clouds building or hear distant thunder, your climb is over. Descend immediately. Do not try to rush to the top or “wait it out” on the route. If you are caught and cannot descend safely, you must implement an emergency protocol. The first and most important step is to detach yourself from the cable. Find a relatively safe spot and move at least 15-20 meters away from the via ferrata infrastructure. Assume a lightning crouch position: balanced on the balls of your feet, heels together, with your head lowered. This minimizes your contact with the ground and presents a smaller target. Wait 30 minutes after the last clap of thunder before even considering re-approaching the cable.
The Buddy System: What to Check on Your Partner’s Harness Before Starting?
While we’ve focused on objective hazards like anchor failure and weather, statistics consistently show that the majority of incidents are caused by subjective hazards—human error. Fatigue, distraction, or simple inexperience can lead to fatal mistakes. One of the most powerful tools to mitigate this is a rigorous, disciplined partner check before anyone takes a single step up the route. Never assume your partner, no matter how experienced, has set up their gear correctly. Trust, but verify.
The most critical connection is the attachment of the via ferrata lanyard to the harness. It must be correctly girth-hitched directly to the harness belay loop—the strong, reinforced loop at the front where a climber would be tied in or use a belay device. It should never be attached to a gear loop, the haul loop on the back, or any other part of the harness. These points are not designed to withstand fall forces and will fail.
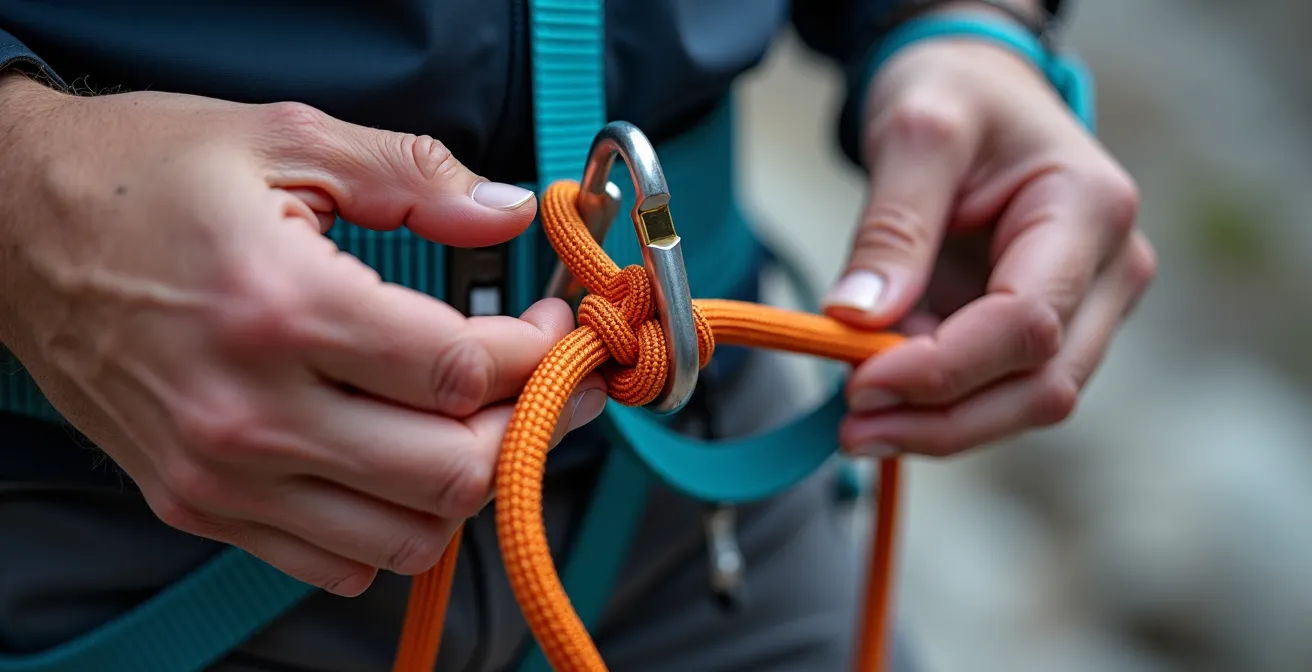
A systematic check can prevent these errors. A useful mnemonic is C.A.B.L.E., which covers the most critical points for both you and your partner. This isn’t a casual glance; it’s a deliberate, physical check of each component. Verbally confirm each point with your partner. This ritual builds a culture of safety and catches the simple mistakes that can have the highest consequences.
- C – Carabiners: Are the gates functioning properly and snapping shut? Are they oriented correctly, and are any locking mechanisms engaged?
- A – Attachment: Is the lanyard correctly and tightly girth-hitched to the harness belay loop? Is the knot dressed neatly without twists?
- B – Buckles: Are all harness buckles properly threaded and doubled-back according to the manufacturer’s instructions?
- L – Lanyard: Is the shock absorber pack sealed and showing no signs of prior deployment or tampering?
- E – Equipment: Is the helmet fitted correctly and buckled? Is appropriate footwear being worn? Are gloves and other necessary gear ready?
MIPS vs. Standard Helmets: Is the Extra Cost Worth the Brain Protection?
A helmet is non-negotiable, but not all helmets are created equal, especially for the specific risks of a via ferrata. Standard climbing helmets are primarily designed and tested to protect against vertical impacts, such as a rock falling from above. They do an excellent job at this. However, a fall on a via ferrata is rarely a straight drop. It’s often a swinging, pendulum-like fall that results in you impacting the rock face at an angle. This creates rotational forces on the brain, a type of impact that standard helmets are less effective at mitigating.
This is where technology like MIPS (Multi-directional Impact Protection System) becomes highly relevant. A MIPS helmet incorporates a low-friction slip-plane liner inside the helmet. During an angled impact, this liner allows the helmet’s outer shell to rotate slightly (10-15mm) relative to the head. This small movement is designed to redirect and reduce the dangerous rotational energies that would otherwise be transferred to the brain. As the EDELRID Safety Equipment Division states, “Via ferrata falls often involve swinging and rotational impacts against the rock face, which is precisely what the MIPS slip-plane liner is designed to mitigate.”
Via ferrata falls often involve swinging and rotational impacts against the rock face, which is precisely what the MIPS slip-plane liner is designed to mitigate.
– EDELRID Safety Equipment Division, Via Ferrata Equipment Guide 2024
While MIPS helmets are typically more expensive and slightly heavier, the added protection they offer against the most common type of via ferrata fall impact is a significant safety advantage. The decision comes down to personal risk assessment, but when considering the consequences of a traumatic brain injury, the extra cost can be seen as a worthwhile investment in your long-term well-being.
| Feature | Standard Helmet | MIPS Helmet |
|---|---|---|
| Vertical Impact Protection | Excellent | Excellent |
| Rotational Impact Protection | Limited | Significant reduction (10-30%) |
| Weight | 250-350g | 280-380g |
| Price Range | $60-120 | $100-200 |
| Multi-Activity Certification | Climbing only | Often climbing + skiing |
| Ideal For | Vertical rockfall protection | Swinging/pendulum falls against rock |
Objective Hazards: How to Read Weather Signs Before the Storm Hits?
Beyond lightning, a host of other weather-related objective hazards can turn a pleasant outing into a serious emergency. Rockfall risk increases significantly after heavy rain, and the formation of verglas (a thin, clear layer of ice) on cables and rungs following a temperature drop can make a simple route treacherous. Your most powerful safety tool is not on your harness; it’s your ability to read the sky and make conservative decisions long before a storm hits. Relying solely on a morning forecast is not enough; the mountains create their own weather.
Developing mountain sense means constantly observing your surroundings. Look for visual indicators of atmospheric instability. Rapidly building, tall cumulus clouds (that look like cauliflower) are a clear sign that the atmosphere is unstable. If these clouds begin to flatten out at the top into an anvil shape, a thunderstorm is imminent and you should have already been descending. Other signs, like lenticular clouds (lens-shaped clouds) forming over summits, indicate extreme high-altitude winds, which can bring rapid changes and pose a significant balance risk on exposed sections.
The importance of this skill is underscored by rescue statistics. According to safety data from Alpine rescue services, lightning and sudden weather changes account for approximately 30% of all via ferrata emergencies. These are largely preventable incidents. Learning to recognize the early warning signs gives you the time needed to retreat to safety.
- Rapidly building vertical cumulus clouds: Indicates growing instability. Time to consider turning back.
- Anvil-shaped cumulonimbus tops: A thunderstorm is imminent. Evacuate the route immediately.
- Lenticular clouds over summits: A sign of extreme high-altitude winds, often preceding a storm front.
- Sudden temperature drop and wind increase: A classic indicator of an approaching cold front and associated weather.
- Morning valley fog that lifts rapidly: This can indicate a high potential for powerful afternoon thunderstorms due to solar heating.
Key takeaways
- A via ferrata fall is a high-impact event due to the static cable, generating far greater forces than a climbing fall.
- Your specialized via ferrata lanyard with its single-use energy absorber is the only thing that makes a fall survivable, and it has strict weight limits.
- You are responsible for inspecting the route’s integrity and recognizing both human-caused (subjective) and environmental (objective) hazards like weather and anchor failure.
Wilderness Risk Management: How to Plan Adventures in Uncontrolled Environments?
Ultimately, safety on a via ferrata boils down to a single concept: risk management. It’s a continuous process of identifying hazards, assessing their likelihood and consequences, and making decisions to mitigate them. A useful framework for this is to separate hazards into two categories: objective and subjective. This mental model helps you focus your energy on what you can control while respecting what you cannot.
Objective hazards are environmental factors inherent to the mountain. These include rockfall, lightning, anchor failure, and sudden weather changes. You cannot stop a rock from falling, but you can mitigate the risk by wearing a helmet, choosing routes less prone to rockfall, and avoiding climbing under other parties. You cannot stop a thunderstorm, but you can avoid being in one by carefully planning and monitoring the weather. Mitigation for objective hazards is about avoidance, timing, and route selection.
Subjective hazards are the human factors you bring with you. This is where you have the most control. These include poor judgment, fatigue, equipment misuse, lack of fitness, or dehydration. The most insidious subjective hazard on a via ferrata is overconfidence, a phenomenon known as risk compensation. Because the cable provides a feeling of security, people tend to take more risks than they otherwise would—moving too quickly, neglecting buddy checks, or pushing on into bad weather. The key to managing subjective hazards is discipline, training, self-awareness, and a commitment to conservative decision-making.
The following table provides a clear framework for distinguishing and managing these two types of hazards. Your goal is to minimize your exposure to objective hazards through planning and maximize your control over subjective hazards through discipline.
| Hazard Type | Examples | Control Level | Mitigation Strategy |
|---|---|---|---|
| Objective (Environmental) | Rockfall, lightning, anchor failure | Cannot control | Timing, route selection, weather monitoring |
| Subjective (Human) | Poor judgment, fatigue, equipment misuse | Can control | Training, fitness, buddy checks, conservative decisions |
| Risk Compensation | Overconfidence from ‘being clipped’ | Psychological blind spot | Awareness training, maintain climbing discipline |
Your safety on a via ferrata depends not on the cable, but on your knowledge and discipline. It is a commitment to seeing the mountain environment for what it is and respecting the forces at play. Treat every route as a serious undertaking and make these checks and assessments an unbreakable habit.