A piece of safety gear that appears undamaged can be structurally compromised and useless; visual inspection alone is a dangerous and unreliable method of assessment.
- Protective materials undergo silent degradation from environmental factors like UV light, even when stored.
- The internal foam of a helmet or pad is designed for a single impact, after which its protective capability is permanently reduced, regardless of its outward appearance.
Recommendation: Base replacement decisions on a strict protocol of age, impact history, and material integrity testing, not on what you can or cannot see.
An athlete picks up their helmet. It has a few scratches, but it looks solid. A parent pulls a set of pads out of storage for their child, noting they seem a bit faded but otherwise fine. This is the moment where the most critical safety miscalculation is made. The prevailing wisdom is to check for visible damage—cracks, dents, or tears—and if none are found, the gear is deemed safe. This assumption is fundamentally flawed and dangerously misleading. The integrity of safety equipment is not a surface-level issue; it is a question of material science.
Most advice focuses on replacing a helmet after a significant crash, which is correct but incomplete. It fails to address the invisible threats that degrade protective materials over time. The true dangers are the ones you cannot see: the embrittlement of plastics from sunlight, the permanent compression of protective foams, and the chemical compromise from improper care. These factors lead to a catastrophic loss of performance that is undetectable to the naked eye. Relying on a visual check is like judging the health of a tree by its bark while ignoring the rot at its core.
The purpose of this guide is to dismantle the myth of visual inspection. We will move beyond the platitudes and adopt the uncompromising protocol of a certification expert. This is not about saving money or extending the life of old equipment. It is about understanding the non-negotiable principles of material failure. We will analyze the silent degradation caused by UV exposure and foam compression, clarify the real-world difference new technologies like MIPS make, expose the absolute danger of used equipment, and establish a clear framework for investment and maintenance. This is the definitive procedure for ensuring the gear you trust is actually trustworthy.
This article provides an in-depth, evidence-based protocol for evaluating and replacing your safety equipment. The following sections break down each critical factor, from material science to budget allocation, to provide a complete safety framework.
Contents: The Definitive Guide to Safety Gear Replacement
- Why UV Exposure Degrades Helmet Plastic Even Without Crashes?
- How to Check if Your Padding Has Compressed Too Much to Protect You?
- MIPS vs. Standard Helmets: Is the Extra Cost Worth the Brain Protection?
- The Hidden Danger of Buying Used Safety Gear for Your Children
- Cleaning vs. Chemical Damage: How to Wash Pads Without Dissolving Glue?
- How to Identify Reinforced Seams on Technical Apparel Before Buying?
- How to Use Impact Shorts and Wrist Guards to Boost Confidence?
- Entry-Level vs. Pro Gear: Where Should Amateurs Spend Their Budget?
Why UV Exposure Degrades Helmet Plastic Even Without Crashes?
A helmet’s outer shell, typically made of polycarbonate or a similar polymer, serves as the first line of defense. Its function is to distribute the force of an impact across a wider area and prevent penetration. However, this material is under constant, silent attack from an invisible enemy: ultraviolet (UV) radiation. Even on cloudy days or when stored near a window, UV light bombards the plastic, initiating a process called photodegradation. This is not a cosmetic issue of fading color; it is a fundamental breakdown of the polymer chains that give the shell its strength and flexibility.
Over time, this exposure makes the plastic increasingly brittle and weak. A new helmet shell is designed to flex slightly upon impact, absorbing and redirecting energy. A UV-degraded shell, however, loses this ductility. Instead of flexing, it is more likely to fracture or shatter, concentrating impact forces rather than dispersing them. This structural failure can occur at force levels significantly lower than what a new helmet could withstand. This is why a helmet has an expiration date (typically 3-5 years from manufacture), even if it has never been in a crash and has been stored with care.
The degradation is often invisible. While some signs like yellowing, a chalky surface texture, or micro-fissures may appear, their absence does not guarantee material integrity. Scientific analysis shows that significant loss of tensile strength can occur long before it is visually apparent. According to research on polymer degradation, even incidental sun exposure accumulates, compromising the material’s ability to perform its one critical job. Therefore, the age of the helmet is a non-negotiable factor in its replacement schedule. It is a ticking clock on its structural viability.
How to Check if Your Padding Has Compressed Too Much to Protect You?
Inside every helmet and pad, the most critical component is the energy-absorbing liner, usually made of Expanded Polystyrene (EPS) foam. Its job is to crush upon impact, slowing the head’s deceleration and reducing the force that reaches the brain. This is a one-time-use mechanism. Once the foam is compressed, its structure is permanently altered, and it will not provide the same level of protection again. The danger is that this compression is often not visible, or the foam may rebound just enough to look normal.
For softer pads on knees, elbows, and hips, the foam is designed for multiple, lower-grade impacts. However, it still suffers from compression fatigue. Over time, with repeated pressure from falls or even just the wearer’s body weight, the foam cells break down and do not rebound to their original thickness. This “packed-out” foam offers a fraction of its intended shock absorption. A reliable method to test this is the 10-second compression test. Press your thumb firmly into a section of the padding and hold for 10 seconds. On new or healthy foam, the indentation will disappear almost immediately (within 1-2 seconds). If the foam takes longer to recover, or if the indentation is permanent, the material is compromised and must be replaced.
The illustration below demonstrates the structural difference between new, resilient foam and foam that has been permanently compressed. Notice how the cell structure in the worn foam has collapsed, eliminating the space that is crucial for energy absorption.
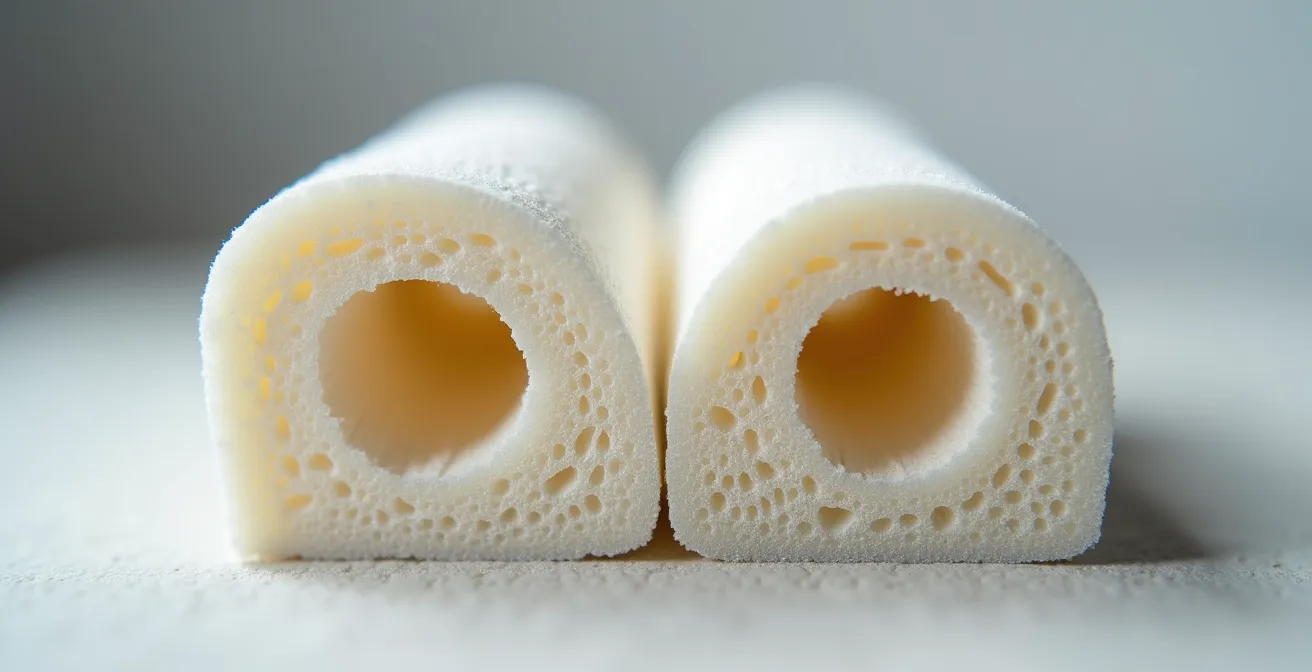
You must systematically check different areas of your padding, as wear is rarely uniform. The areas over the points of your joints (knees, elbows) will typically show the most compression. As documented by orthopaedic specialists, gear should be phased out as soon as this loss of rebound is detected. Do not wait for a catastrophic failure to reveal that your padding has lost its protective qualities.
MIPS vs. Standard Helmets: Is the Extra Cost Worth the Brain Protection?
For decades, helmet safety standards focused primarily on linear impacts—direct, head-on collisions. However, most real-world accidents involve angled impacts, which generate rotational motion. This rotational force is a major contributor to concussions and more severe traumatic brain injuries. Standard helmets, while effective against direct forces, offer limited protection against this twisting. This is the problem that the Multi-directional Impact Protection System (MIPS) was designed to solve.
A MIPS-equipped helmet looks nearly identical to a standard one but contains a crucial addition: a low-friction layer situated between the comfort padding and the EPS foam shell. This layer allows for 10-15mm of relative motion between the head and the helmet in all directions during an angled impact. This slight slip mimics the brain’s own protective system, redirecting and reducing the dangerous rotational forces that would otherwise be transferred to the brain. It is not about absorbing more impact, but about changing how the force is managed.
Case Study: Virginia Tech Rotational Force Testing
Independent testing by respected institutions like the Virginia Tech Helmet Labs has become a benchmark for safety. Their protocols specifically measure how well a helmet reduces both linear acceleration and rotational velocity from a variety of impacts. As noted in their evaluations, protective headgear that incorporates slip-plane technology consistently demonstrates a significant reduction in rotational forces. This data confirms that systems like MIPS are not a marketing gimmick but a proven advancement in mitigating the specific forces linked to many brain injuries.
The following table, based on composite data and manufacturer claims, breaks down the key differences. It demonstrates that the primary benefit of MIPS is its specialized ability to handle rotational forces, a factor standard helmets are not designed to address as effectively.
| Feature | Standard Helmet | MIPS Helmet |
|---|---|---|
| Rotational Force Protection | Limited | Designed to reduce rotational forces |
| Post-Impact Inspection | Check foam compression | Check foam + MIPS layer integrity |
| Replacement After Impact | Required after any significant impact | Required after any significant impact |
| Typical Lifespan | 3-5 years | 3-5 years |
| Price Premium | Base price | Typically $20-$50 more |
Given that a reduction in rotational force is proven to lower the risk of brain injury, the additional cost for a MIPS-equipped helmet is a direct investment in a higher level of safety. For any activity with a risk of falling, it represents the current standard of care in brain protection.
The Hidden Danger of Buying Used Safety Gear for Your Children
The temptation to buy used safety gear, especially for a growing child, is understandable from a budget perspective. It is also one of the most dangerous decisions a parent can make. A used helmet is a black box of unknown history. You have no way of knowing if it has been dropped, involved in a crash, or improperly stored. As we’ve established, the damage that renders a helmet useless is often completely invisible.
You would not buy a used car without a vehicle history report, yet a helmet’s history is even more critical. There is no such report. Has it been left in a hot car, causing thermal damage to the foam and glues? Has it been exposed to years of UV light, making the shell brittle? Most importantly, has it already sustained its one-and-only designed impact? The Bicycle Helmet Safety Institute provides an uncompromising perspective on this matter:
The foam part of a helmet is made for one-time use, and after crushing once it is no longer as protective as it was, even if it still looks intact.
– Bicycle Helmet Safety Institute, Helmet replacement guidelines
This one-time use principle is absolute. When you buy a used helmet, you are gambling that its single protective life has not already been spent. This is not a risk worth taking. The small amount of money saved is insignificant compared to the potential cost of a preventable brain injury. The same logic applies to pads with compromised foam or apparel with weakened seams. If you must inspect a piece of used gear, a rigorous, almost forensic, protocol is required.
Your Action Plan: Used Helmet Vetting Protocol
- Surface & Shell Integrity: Remove all stickers, which can hide hairline cracks. Examine the entire shell surface under a bright, angled light for stress fractures, which often appear as faint white lines in the plastic.
- Manufacturing Date & History: Locate the manufacturing date sticker inside the helmet. Reject any helmet that is more than 5 years old, regardless of its apparent condition. Question the seller about its history, but do not rely on their word.
- Foam and Liner Inspection: Press firmly on every square inch of the internal EPS foam. Any area that feels soft, stays compressed, or shows visible compression marks indicates the helmet has already taken an impact and is useless.
- Component Check: Inspect the retention system (straps and buckles) for fraying, sun-fading, or corrosion on any metal rivets. Ensure the buckle clicks securely and releases smoothly.
- Final Verdict: If the helmet fails even one of these checks, or if there is any doubt about its history, do not purchase it. The only safe helmet is one with a known, impact-free history.
The only responsible choice is to purchase new, certified safety equipment from a reputable retailer. This is the only way to guarantee its material integrity and impact history.
Cleaning vs. Chemical Damage: How to Wash Pads Without Dissolving Glue?
Maintaining the hygiene of protective pads is essential, but improper cleaning can be as damaging as a physical impact. The adhesives, foams, and synthetic fabrics used in modern gear are highly engineered materials that can be irreversibly damaged by common household chemicals. Solvents, degreasers, bleach, and even some harsh detergents can cause chemical compromise, dissolving the glues that hold layers together (delamination) or breaking down the structure of the protective foam itself.
The correct procedure involves using only products specifically designed for technical athletic gear. These are typically pH-neutral, enzymatic cleaners that break down organic materials like sweat and bacteria without attacking the synthetic polymers of the equipment. The washing process itself must also be gentle. High heat from a machine dryer or direct sunlight can cause the foam to become brittle and the plastics to warp, permanently altering their shape and protective qualities. The only safe method is to air dry gear completely, away from direct heat sources.
The image below illustrates a safe cleaning setup. Notice the use of cool water in a basin and air drying on a towel—methods that protect the gear’s material integrity while ensuring hygiene.

Before using any new cleaning product, you must test it on a small, inconspicuous area of the pad to ensure it does not cause discoloration or material damage. If you notice any peeling, bubbling, or separation of layers on your pads after washing, this is a sign of delamination. The pad’s structural integrity is compromised, and it must be retired immediately. Proper cleaning is a delicate balance; it is a maintenance protocol, not a brute-force sanitation process.
How to Identify Reinforced Seams on Technical Apparel Before Buying?
While helmets and pads absorb impact, technical apparel provides abrasion resistance and structural integrity. A slide on asphalt or a snag on a branch can easily tear low-quality fabric, but the real point of failure is often the seams. The quality of stitching is a direct indicator of an item’s durability and its ability to protect you during a fall. Identifying high-quality construction is a skill that allows you to assess gear before you invest in it.
First, look for reinforced stitching at high-stress points. These include the corners of pockets, the base of belt loops, and crotch gussets. The presence of “bar tacks”—a series of dense, repetitive stitches—indicates that the manufacturer has intentionally fortified an area prone to tearing. The absence of such reinforcements on a piece of “protective” apparel is a significant red flag. Second, identify the type of seam used. A “flat-felled seam,” common in high-quality denim, involves folding the fabric edges over each other and stitching them down with two parallel rows. This creates an incredibly strong, flat, and durable seam that is far superior to a basic overlock stitch, which simply wraps thread around the edge of the fabric.
The material of the thread itself is also critical. Standard polyester thread is adequate for fashion clothing, but for protective gear, you should look for mentions of high-tenacity nylon or even Kevlar thread. As technical specifications indicate, the use of high-tenacity nylon threads can increase seam strength by up to 40% compared to standard polyester. A gentle pull test on a seam can also reveal its quality; if you see the threads pulling apart or hear any snapping sounds, the tension is poor and the seam will likely fail under stress. Investing a few moments in this tactile inspection can be the difference between gear that holds together and gear that disintegrates when you need it most.
How to Use Impact Shorts and Wrist Guards to Boost Confidence?
The function of protective gear extends beyond the purely physical. For both new and experienced athletes, a significant psychological barrier to skill progression is the fear of falling and the resulting injury. This fear creates hesitation, tentative movements, and a focus on avoidance rather than execution. Properly fitted, high-quality protective gear serves as a mental safety net, directly boosting an athlete’s confidence and accelerating their learning curve.
Impact shorts, which protect the hips, thighs, and tailbone, are particularly effective for sports like snowboarding, skateboarding, or roller derby. A fall on the hip or tailbone is not only painful but can create a lasting, debilitating fear. By mitigating the consequences of these common falls, impact shorts allow the athlete to commit more fully to the movements required to learn a new trick or skill. Similarly, wrist guards are essential for any activity where you are likely to extend your hands to break a fall. The knowledge that a fall will not necessarily result in a sprained or broken wrist frees the mind to concentrate on balance and technique.
However, this confidence is only granted if the gear is trustworthy. Ill-fitting pads that shift during movement create uncertainty, defeating the purpose. The goal is to reach a state where the gear feels like a natural extension of the body, allowing the athlete to focus entirely on performance. Studies on athlete psychology confirm that those wearing appropriate protection are more likely to push their limits and master skills faster because their cognitive resources are not being consumed by injury anxiety. The gear effectively offloads the mental burden of “what if,” allowing for a state of deeper focus and more aggressive progression.
Key Takeaways
- Age is a non-negotiable factor: All helmets must be replaced every 3-5 years due to invisible UV and material degradation, regardless of use.
- Foam is a one-time defense: The EPS foam in a helmet is designed for a single impact. Any helmet that has sustained a significant drop or crash is no longer safe.
- Used gear is an unacceptable risk: An unknown impact history makes used safety equipment a dangerous gamble. The only safe gear is new gear.
Entry-Level vs. Pro Gear: Where Should Amateurs Spend Their Budget?
When building a set of protective gear, a common question is where to allocate a limited budget. Should you invest in a top-of-the-line helmet and save on pads, or distribute the cost evenly? The answer, from a safety certification standpoint, is unequivocal: your budget must be prioritized based on the criticality of the body part being protected. Not all gear provides an equal return on investment in terms of safety.
Your helmet is the single most critical piece of equipment, and it is not the place to compromise. The difference between an entry-level and a pro-level helmet is not just comfort or aerodynamics; it’s often access to advanced safety technologies like MIPS and superior ventilation, which allows you to keep the helmet on. Since all certified helmets must be replaced on a similar 3-5 year schedule, the extra cost is for a higher degree of protection during that lifespan, not for a longer life. This is the area to splurge.
For knee and elbow pads, the difference between entry-level and pro-level models is often found in durability and fit. Pro-level pads use more robust materials and construction techniques, meaning they will withstand more abuse and last longer. While an entry-level pad can provide adequate protection initially, it will likely compress and wear out much faster. Therefore, investing more here can be cost-effective in the long run. Conversely, items like gloves and general apparel are lower-priority areas where you can safely save money. Their primary function is abrasion resistance, and the protective difference between price points is less critical than it is for impact-absorbing gear.
This budget allocation guide helps clarify where your investment matters most for long-term safety and value. It prioritizes spending on components that protect against life-altering injury.
| Equipment | Priority Level | Entry-Level Lifespan | Pro-Level Lifespan | Cost-Benefit Analysis |
|---|---|---|---|---|
| Helmet | Critical – Splurge | 3-5 years | 3-5 years | Pay for MIPS, superior fit, and ventilation. |
| Knee/Elbow Pads | High Priority | 1-2 seasons | 3-4 seasons | Pro gear offers 2-3x the durability and better fit. |
| Gloves/Wrist Guards | Medium Priority | 1 season | 2 seasons | Moderate benefit in durability for the cost increase. |
| Impact Shorts/Apparel | Low Priority | 2 years | 3 years | Save money here; focus on fit over high-end features. |
Ultimately, a mid-range, well-fitting set of pads paired with a top-tier helmet is a safer and more strategic investment than a full set of pro-level gear that compromises on helmet quality.
The only responsible action is to audit your equipment with this uncompromising protocol. Do not gamble with structural integrity; make your replacement decisions based on science and a strict timeline, not on fallible visual inspection.